Practitioner Data Entry
The first screen that presents for data entry is the Demographic information.
|
Field |
Description |
Example |
|---|---|---|
|
Practitioner Type * |
Practitioner type/specialty |
Neuropsychologist (NEU) |
|
Last Name * |
Practitioner’s surname |
Agbayani |
|
First Name * |
Practitioner’s given name |
Chloe |
|
Middle Name |
Practitioner’s middle name |
Grace |
|
Prefix |
Honorific prefix, for example: Dr., Mr., Mrs., Ms., Mx. |
Ms. |
|
Birth Date |
Practitioner’s birthday in MM/DD/YY format |
09/20/1986 |
|
SSN |
Practitioner’s social security number |
123-45-6789 |
|
NPI Practitioner |
Practitioner’s National Practitioner Identification number |
1467586115 |
|
Ethnicity |
Practitioner’s ethnicity |
Filipino |
|
Citizen |
This checkbox denotes if this practitioner is a citizen |
☒ |
|
Citizen Country |
The practitioner’s country of citizenship |
United States |
|
Birth Country |
The practitioner’s country of birth |
Philippines |
|
Notes |
Any notes pertaining to this practitioner |
|
Fields noted with an asterisk (*) are required.
Enter the data requested and select the Save button to save your work.
Once the Demographics data is saved additional menus will become available for entry. Menus with an arrow next to the name have additional sub menus for data entry.
|
Menu |
Description |
|---|---|
|
Main |
This is the main menu. |
|
Practice |
Practices where the practitioner has worked. |
|
Licenses |
Professional license that the practitioner holds |
|
Appointment and Description |
Hospital privileges that the practitioner holds/has held. |
|
Education |
The practitioner’s educational history. |
|
Insurance |
Insurance information. |
|
Plans and Description |
Payer Plan/Product information. |
|
Images and Documents |
Images and documentation associated with the practitioner. |
|
Docs |
Documents provided by the sponsoring association that must be downloaded, completed, and then re-uploaded to eApply. |
|
Submit |
Information review before submitting the application. |
Screen-level Data Entry
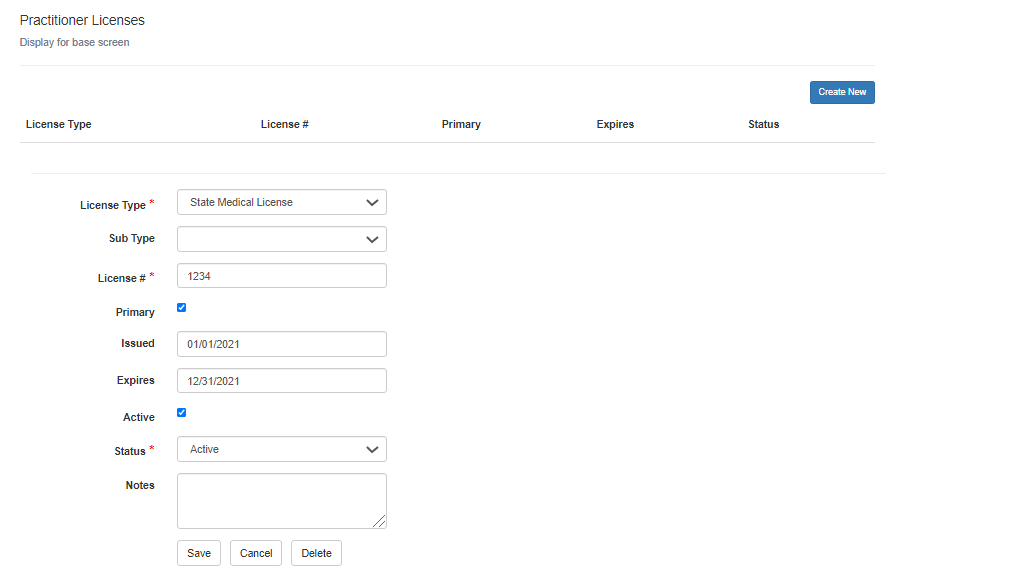
All additional data entry panels function in the same manner. The following example uses the License menu to illustrate.


To create a new row of data:
-
Click the Create New button to open the data entry panel
-
Enter data ensuring all required fields are populated.
-
Save

If additional new data is needed for the same panel, repeat the steps above.
If edits are needed to the existing data clicking on the data hyperlink will open that panel for editing.
Navigate through the menu items and complete all applicable data entry.
Images
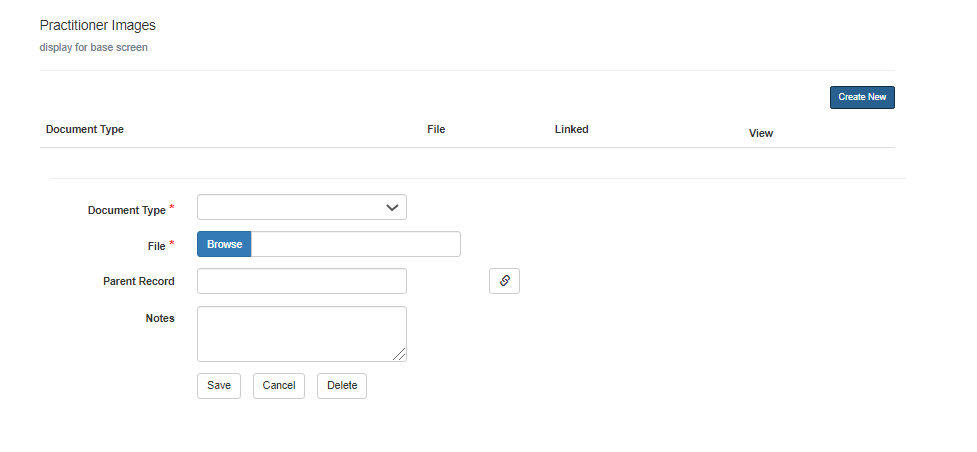
The Images panel functions similarly to other data entry panels.
-
Click the Create New button to open the data entry panel.
-
Select the appropriate value from the Document Type dropdown field.
-
Use the Browse button to navigate to the Image file you are uploading and select Open.
-
(Optional) To link the image to a record, click the link icon and select the appropriate record.
-
Save.
Repeat these steps to upload additional images need.
Documents
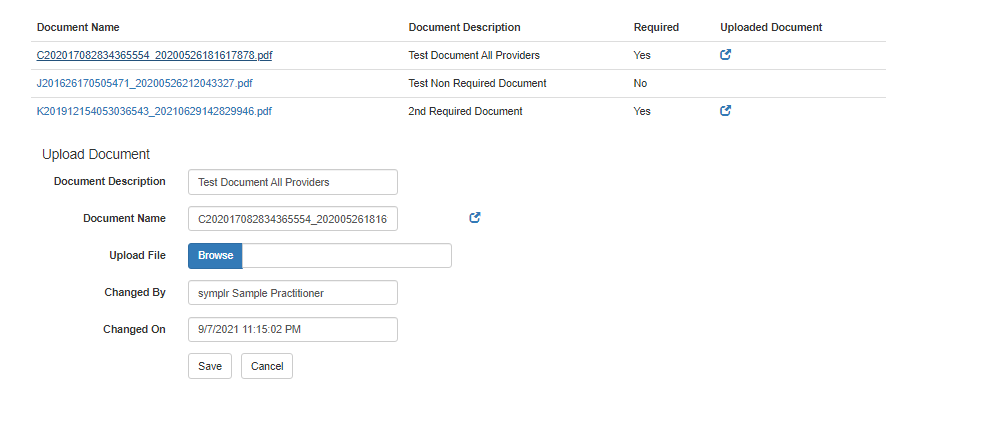
The Documents panel contains documents that the sponsoring organization needs the provider to download and complete and/or sign and then upload to eApply. This is currently only available for Practitioner records.
-
Click the Document Name hyperlink to open the panel.
-
Select the download icon next to the Document Name field to download a copy of the document to be completed and/or signed.
-
Once completed use the Browse button to navigate to the Image file you are uploading and select Open.
-
Save.
If additional documents need to be uploaded repeat the steps above.

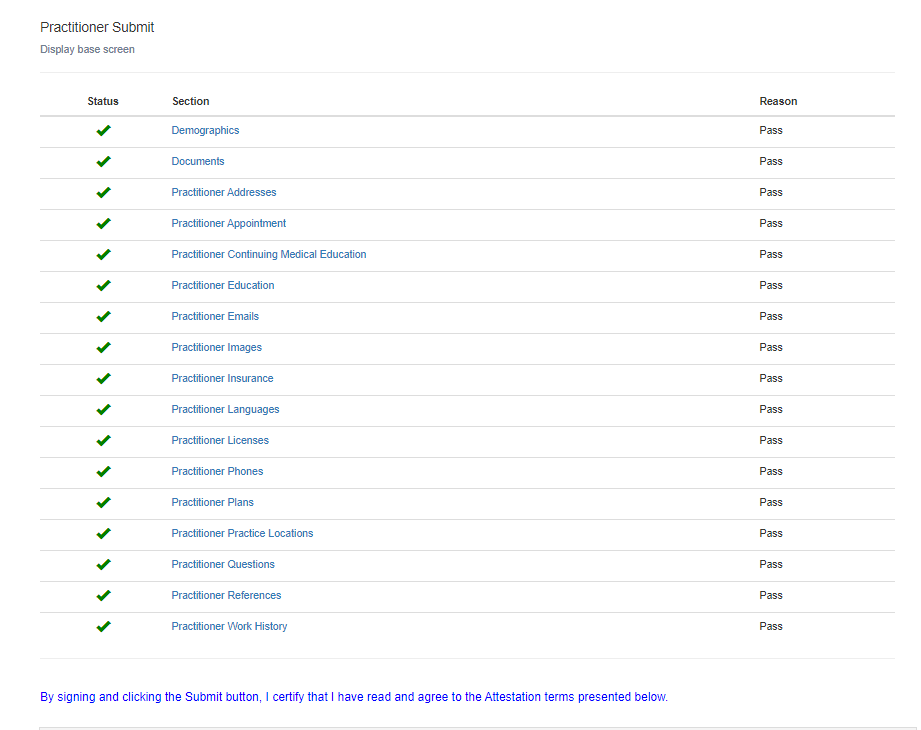
Once all necessary data, images and documents have been entered and uploaded select the Submit button and you should see all required panels with a green check mark.
If any sections have been omitted, you will see a red X and this data must be completed before submission can occur. Click Submitting the Application, above, to return to the Document page to complete the missing information.
Incomplete Application Example

In the above example, Documents, Practitioner Licenses and Practitioner Work History is not complete. Therefore, this application is not ready to submit.
Complete Application Example

In the above example, all sections are recognized to be complete and marked with a green checkmark. Therefore, this application is ready to submit.
Once the application has been successfully submitted you will receive this message and have an opportunity to download a PDF copy of your submitted application data.
The sponsoring organization will be notified of your submission for processing.


